Fallout Nuka Cola Reconstruction
(Glow Recipes + Aged Labels Guide)
A Wasteland Kitchen Build Log
Fallout-style Nuka bottles look simple until you try to make them glow, weather convincingly, and feel like artifacts instead of novelty props.
This is not a mass-produced craft. I created these for fun, and want to share the process and the results.
Shop link to my aged label templates are included within the log for those who want a faster starting point.
── ✶⋅✄⋅✶ ──
Before the Reconstruction
These bottles are For Display ONLY. Do NOT drink them.
If you have pets or children, store them out of reach.
Though glow pigment will settle over time due to physics,
a gentle swirl or a hard shake brings it back to life.
── ✶⋅✄⋅✶ ──
Fallout Nuka Cola Reconstruction Log
You don’t need rare materials. You just need usable ones, so save your odds & ends!
Core materials
- Reused glass soda bottles (Mexican Coke bottles are ideal for the silhouette)
- Bottle caps that fit securely
- Printable Nuka-Cola label (template linked in tutorial)
For labels
- Canva or equivalent design tool
- Printer (your local library is a great resource if you don’t own one)
- Matte sticker paper, matte cardstock, or regular printer paper
- Scissors or craft knife
- Adhesive of choice (glue stick, pva craft glue, tape, or spray adhesive)
For liquid
- Distilled water
- Food coloring
- Glow-in-the-dark paint
- Optional: mica powder, glitter
For aging
- Black tea
- Soft brush or sponge
- Optional diluted acrylic or charcoal for grime
- Optional: Varnish or gloss sealant
For sealing and display (optional but recommended)
- Plastic wrap and rubber bands, the smaller the better, to seal the bottle underneath the bottlecap.
Clean Your Bottles
Wash inside bottles thoroughly with hot water and dish soap.
Remove any remaining adhesive with:
warm soapy soak + scraping with a plastic scraper, or
a little oil (cooking oil) rubbed on adhesive, then soap to remove oil
Dry completely.
The label problem (especially Fanta)
Some bottles have printed lettering on the glass (not a label). If your “Nuka Orange” base bottle has orange or red branding baked into the glass/painted on, face facts now: You can’t “remove” it cleanly.
Your solution is to print on thicker paper or double-layer labels so the lettering can’t show through.
Authors note: If you do figure out a way to remove the lettering from a Mexican coke bottle, please tell us your secrets. I tried paint thinner, rubbing alcohol, hydrogen peroxide and baking soda, and finally citric acid and none of them worked. The letters stayed firmly in place.
Determine the label size
While creating your bottle labels, you have two good options:
Option A: Measure Your Bottle
- Wrap a strip of paper around the bottle where the label will go
- Measure width and height of the label area
- Mark overlap point
Option B: Use a flexible template approach
- Create a label design you can scale
- Print a test page on regular paper
- Hold it up to the bottle and adjust size
In Canva
- Create a new design:
- Use custom size in inches (or mm) based on your bottle
- Build your label:
- Background color / texture (slightly off-white looks more “aged”)
- Main logo/text
- Secondary text and small details (this sells “prop authenticity”)
- Export settings:
- PDF Print is best for crisp text
- If exporting as PNG, use high resolution
If you’d rather start with my base reconstruction files, the label set is available here in my studio shop. Use them as-is or alter them to fit your own build.
Printing tips
- Print a test sheet on cheap paper first.
- Adjust scale until it fits the bottle’s curvature and doesn’t wrinkle badly.
Paper choice recommendation
- If you want the easiest, cleanest application use matte sticker paper
- If you want more “artifact” texture use matte presentation paper + adhesive
Step 3: Cut labels cleanly
- Cut slightly outside the design first (rough cut)
- Then do a slow final cut for clean edges
- If you want rounded corners, do it consistently across all labels
- Use a matching marker to ink around the edges of the label to remove the white “freshly printed” look
Core Bottle Method
Applies to: All Nuka Variants
Method
- Add distilled water to bottle, filling about halfway.
- Add food coloring until liquid reaches desired resting color. (this is what color the liquid will look when it’s resting on the shelf).
- Add a tiny pinch of mica powder. (optional)
- Add glitter (optional, but generous).
- Add glow-in-the-dark paint.
- Cap and gently swirl to combine until all the contents are fully mixed together.
tip: holding a flashlight or a blacklight under the bottle intermittently helps confirm contents are fully combined. - Once you are satisfied with the color, glow level, and glitter density of the contents, add distilled water to fully fill up the bottle.
- Stretch a small piece of plastic wrap tightly over the opening of the bottle. (I like to use several layers, trimming the excess each time to keep it neat.) After 3–4 snug layers, place one slightly larger piece of plastic wrap over the top to cover everything. Secure firmly with a small rubber band. For extra protection against leaks when shaking, add a second rubber band and an additional outer layer of plastic wrap.
Age the labels
You can age labels before or after attaching. Each has a different look. Due to using sticker paper, I found it much easier to age them before adhering than after.
Important: Whichever method you go with: do not fully soak the labels. Paper + water = warping.
Aging BEFORE attaching (cleaner control)
- Brew strong tea (dark).
- Lightly brush tea onto label with a soft brush or sponge. (personally, i was impatient and took that tea bag and smacked it on the labels until it was crumbling apart, so your call)
- Blot gently with paper towel.
- Let dry completely under something flat (prevents curling).
Aging AFTER attaching (more “realistic grime”)
- Make tea and let it cool slightly.
- Use a barely-damp sponge/brush.
- Apply in small passes, especially edges.
- Blot quickly.
Extra aging tricks (optional)
- Very diluted brown/gray paint dabbed near edges for “grime”
- A tiny bit of charcoal rubbed on corners/edges for wear
- Light scuff marks near where hands would naturally grab
Step 4: Apply labels (four methods)
Method 1: Sticker paper (easiest)
- Peel backing slowly.
- Align the center first, then smooth outward.
- Use a soft cloth to press down and push out bubbles.
Pros: clean, fast
Cons: some sticker papers can look too “new” unless aged
Method 2: Glue stick (shockingly good)
- Apply glue thinly and evenly to the back of the label.
- Let it sit 10–20 seconds to get tacky (less slip).
- Apply to the bottle; smooth gently.
- Wipe any glue squeeze-out immediately.
Pros: cheap, accessible
Cons: edges can lift if not sealed
Method 3: Double-sided tape
- Put tape on the label back, especially edges.
- Good for avoiding wrinkles.
Pros: less moisture, less warping
Cons: tape lines can show if paper is thin
Method 4: Spray adhesive (best finish, highest chaos)
- Spray outside in a well ventilated area.
- Light coat on label back.
- Apply carefully (it grabs quickly).
Pros: most professional look
Cons: messy, little room for repositioning
Special note covering bottle lettering: If your base bottle has branding that shows through,
it’s easier to cover them than it is to remove them. Simply print multiples of each label and stack them on top of each other before adhering them to the bottle.
Seal the labels (recommended for durability)
If these are purely shelf display and you don’t handle them much, you can skip sealing. But sealing is worth it because:
- it protects tea-aging
- it prevents edge lifting
- it makes them wipeable
Best options
- Clear matte spray sealant (light coats)
- Clear satin spray if you want a slightly “manufactured” look
If using Mod Podge
- Use matte
- Apply very thin coats
- Test first (it can wrinkle some printer inks)
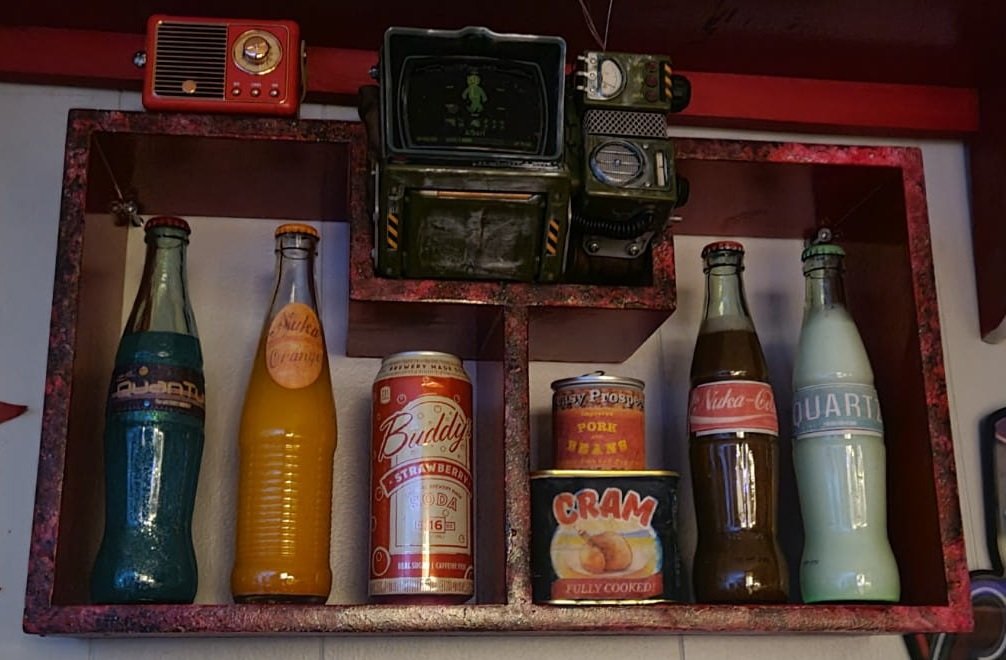
Step 8: Finishing touches that make it look intentional
- Keep the label placement consistent across bottles (same height)
- Arrange by color gradient on the shelf
- Use lighting:
- a small LED strip behind the shelf looks incredible
- Expose your bottle to a UV lamp, turn off the lights, and bask in your creation’s eerie glow.
- If you want extra drama, set it on a LED coaster or under a light-up display base
── ✶⋅✄⋅✶ ──
🧯 Troubleshooting
“My label wrinkled.”
Mild wrinkles read as wear. Severe wrinkles mean too much moisture. Adjust next time.
“The liquid looks cloudy.”
Some cloudiness enhances the “un-looted for decades” effect.
“Pigment settled to bottom.”
Swirl gently. Or accept it as sediment.
What I Would Do Differently
Use thicker matte paper, regular printer paper wrinkles easier.
Standardize label height measurement – looks better on shelf.
Run sealing tests before committing to final bottles.
Every reconstruction improves the next one.
── ✶⋅✄⋅✶ ──
🧴 Additional Recipes
Nuka Cola Classic
Goal: deep cola tone + subtle shimmer
Method
- Distilled water: fill bottle midway
- Food coloring: brown isn’t always available, so mix carefully:
- a tiny bit red + a tiny bit green can create a dark tone, that looks sort of scummy when it sits on the shelf, perfect for that “found while scavenging” look
- or use very tiny amounts of black if you have it
- Glow paint: small to moderate (too much can wash out the dark)
- Mica: very small pinch
- Cap and gently swirl to combine until all the contents are fully mixed together.
tip: holding a flashlight or a blacklight under the bottle intermittently helps confirm contents are fully combined. - Once you are satisfied with the color, glow level, and glitter density of the contents, add distilled water to fully fill up the bottle.
- Stretch a small piece of plastic wrap tightly over the opening of the bottle. (I like to use several layers, trimming the excess each time to keep it neat.) After 3–4 snug layers, place one slightly larger piece of plastic wrap over the top to cover everything. Secure firmly with a small rubber band. For extra protection against leaks when shaking, add a second rubber band and an additional outer layer of plastic.
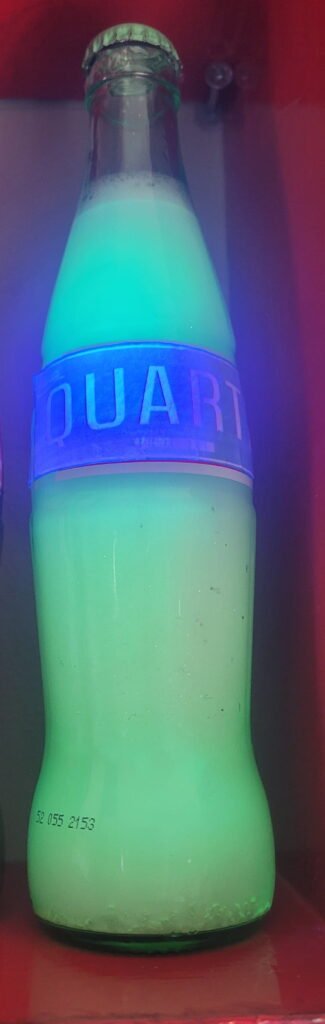
Nuka Quartz
Goal: mostly glow paint + water, minimal tint
Method
- Fill bottle 3/4 full with distilled water
- Glow paint: add enough to make the liquid look milky/ghostly
- Mica: optional (a tiny pinch)
- Glitter: optional – I used a white and shimmery, fine variety
- Once you are satisfied with the color, glow level, and glitter density of the contents, add distilled water to fully fill up the bottle.
- Stretch a small piece of plastic wrap tightly over the opening of the bottle. (I like to use several layers, trimming the excess each time to keep it neat.) After 3–4 snug layers, place one slightly larger piece of plastic wrap over the top to cover everything. Secure firmly with a small rubber band. For extra protection against leaks when shaking, add a second rubber band and an additional outer layer of plastic.
Note: Quartz looks best when the glow paint does most of the visual work.
It reads “radioactive” immediately, especially in low light.
Nuka Orange
Goal: Warm orange with glow shimmer
Method
- Distilled water: fill bottle midway
- Yellow + red food coloring: small amounts until orange
- Glow paint: moderate amount for luminous body
- Pinch of Mica Powder: gold or warm shimmer is ideal (but any works)
- Glitter: optional – I used Flaky Orange pieces and they look so shimmery when the light hits just right
- Label note: If using a bottle with orange branding, double-label to prevent show-through.
- Add glow-in-the-dark paint.
- Cap and gently swirl to combine until all the contents are fully mixed together.
Tip: holding a flashlight or a blacklight under the bottle intermittently helps confirm contents are fully combined. - Once you are satisfied with the color, glow level, and glitter density of the contents, add distilled water to fully fill up the bottle.
- Stretch a small piece of plastic wrap tightly over the opening of the bottle. (I like to use several layers, trimming the excess each time to keep it neat.) After 3–4 snug layers, place one slightly larger piece of plastic wrap over the top to cover everything. Secure firmly with a small rubber band. For extra protection against leaks when shaking, add a second rubber band and an additional outer layer of plastic.
Nuka Quantum
Goal: bright blue/cyan glow with sparkle
Method
- Distilled water: fill bottle midway
- Add Blue food coloring in tiny amounts; building slowly
- Glow paint: moderate to heavy
- Mica: silver/pearl shimmer
- Glitter: optional but works well here. (i used shimmery blue flakes and chunky silver)
- Cap and gently swirl to combine until all the contents are fully mixed together.
Tip: This one glows beautifully under black Lighting - Once you are satisfied with the color, glow level, and glitter density of the contents, add distilled water to fully fill up the bottle.
- Stretch a small piece of plastic wrap tightly over the opening of the bottle. (I like to use several layers, trimming the excess each time to keep it neat.) After 3–4 snug layers, place one slightly larger piece of plastic wrap over the top to cover everything. Secure firmly with a small rubber band. For extra protection against leaks when shaking, add a second rubber band and an additional outer layer of plastic.
After the Reconstruction
I am not making these to sell.
If you want one, ☆build it ☆ (It’s way more fun)
── ✶⋅✄⋅✶ ──
Continue the Wasteland Kitchen Reconstruction
No posts